


Drip irrigation
If summers are dry and water is scarce in your garden you should consider drip irrigation. It doesn’t make a lot of sense if you get plenty of rainfall in summer and only need to irrigate occasionally, because it tends to be quite involved to set up and buying the components isn’t cheap. However some people like it because they can totally automate the watering process, thus saving the labor of watering as well as (possibly) saving water.
Advantages
• They can reduce water consumption by 50%.
• They can increase yields because plants always have water easily available.
• Can work with low water pressure.
• There is less disease because foliage doesn’t get wet.
• Weed growth is less because most of the soil surface remains dry, only the part around the plants gets wet.
• They reduce the amount of work needed, all you do is turn them on and off. You can even put the system on a timer to do this automatically, reducing the work of irrigation to almost nothing.
• They are the most practical way to water container plants.
Disadvantages
• These systems tend to be quite expensive, as you need a lot of parts and pipes to cover a large garden. They are also quite complex and time consuming to lay out.
• They tend to be inflexible in that they aren’t easily moved once set up and are hard to work around. They are most useful for perennial plantings such as trees.
• They are not totally maintenance free, the emitters can get clogged and tubing can be damaged by careless used tools, rodents and sunlight (it’s commonly covered with mulch to protect it from sunlight).
• They encourage you to rely on technology. You just set the timer, or turn on a tap and go indoors, rather than getting out in the garden where you will notice problems as they occur.
If not monitored carefully automated systems can waste water (and even damage plants) by applying more water than is necessary.
• They are made from plastic and eventually become garbage.
These systems are undoubtedly the way of the future in areas where water is scarce and/or expensive. If you are interested in setting up a fully automated drip system I suggest you examine the books and commercial literature. Also look at the various systems in hardware stores, garden centers and more specialist stores.
Most drip fittings are designed for watering single plants and aren’t well suited to a vegetable garden, where you often want to soak the entire bed. Also most drip systems are designed for permanent installation, whereas with vegetables you need a greater degree of flexibility. You change crops frequently and need to be able to cultivate the soil without having plastic pipe in the way. In-line drip emitter tubing solves these problems though (see below).

Drip system components
Specialist irrigation shops are usually more expensive than do-it-yourself stores because they sell higher quality components to professional contractors. This is more durable than homeowner grade stuff and should last longer
Filter
A good filter is essential when using a drip system because the drippers have a very small aperture and if they get clogged with grit or debris they become useless (most are very hard to clean). Use a good, easily cleaned Y filter with a 150 mesh screen for clean municipal water. Dirtier well water (or pond water containing algae) may require a higher mesh filter
Backflow preventer
This is a one way valve that only allows water to travel in one direction. It is necessary (even legally required) when connecting to a potable water source, to prevent dirty water flowing backwards and contaminating the water supply. Anti-siphon control valves don’t work as well, nor does a vacuum breaker attached to the hose
Pressure regulator
This reduces the house water pressure down to 15-30 psi (higher pressure can cause drip fittings to malfunction). Cheap regulators are fixed, more expensive ones are adjustable.
Supply lines
The supply lines that carry the water to different parts of the garden are usually either rigid PVC laid underground (best) or flexible polyethylene. The latter has the advantage that it doesn’t have to be buried. In cold climates you usually drain the system for the winter to prevent damage.
PVC is not a very environmentally friendly material and it would be nice to avoid it. I used it for my garden because it was cheap, but it felt a bit strange dripping all that glue on to my lovely organic soil.
Length of pipe
This is relevant because water pressure drops with distance. For example 200 feet of ½” pipe can supply 240 GPH, but if you double the length of the pipe to 400 feet, the output drops to 160 gph. Normally the maximum length for ½ inch pipe should be 200 feet. If you need to go further than this you should use larger ¾ or 1 inch pipe to get to the center of the garden and then branch off from this with ½” pipe.
Drippers
These are used for watering individual plants. They plug directly into the ½” supply lines and can be spaced anywhere on the line. They are quite flexible in that you can add extra drippers as plants get bigger and need more water, or take them out and plug the holes if you want less. Flag drippers are good if the water isn’t very clean as they can be taken apart and cleaned if they get clogged. On sloping ground you may need pressure compensating emitters to get an even flow (otherwise low spots may get more water than high ones).
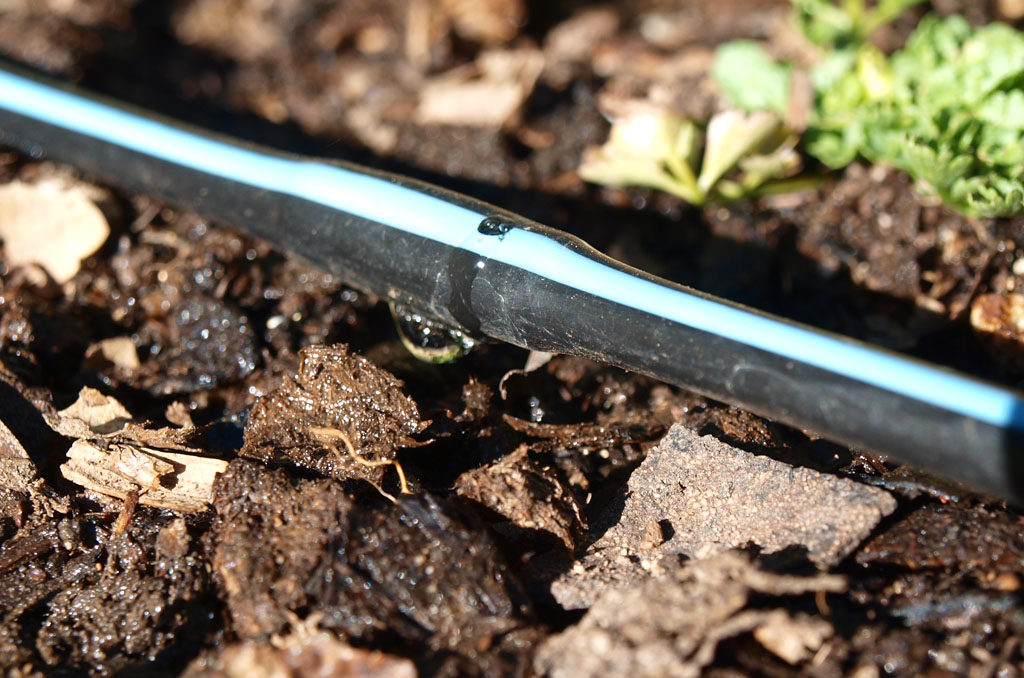
In-line drip emitter tubing
These use the same black PVC pipe as drip irrigation, but have emitters pre-installed in them every 12˝ or so. These work in much the same way as a soaker hose, but are more durable (and better in my opinion).
Drip emitter line is most often used for closely spaced small plants such as vegetables and groundcovers, but short lengths can be attached to ½ inch pipe to water almost anything. I use this combination for most of my garden. There is also ½” drip emitter tubing for greater flow.
Soil staples
These are used to pin the flexible hose down and keep it from moving around. You can buy these, but I make them myself from scrap wire (bend it around a ¾ pipe to get a nice even curve).
Tools and accessories
You will need a hole punch for attaching drippers and a knife or secateurs for cutting the pipe. A fishing tackle box is great for keeping all of your small parts together and organized.
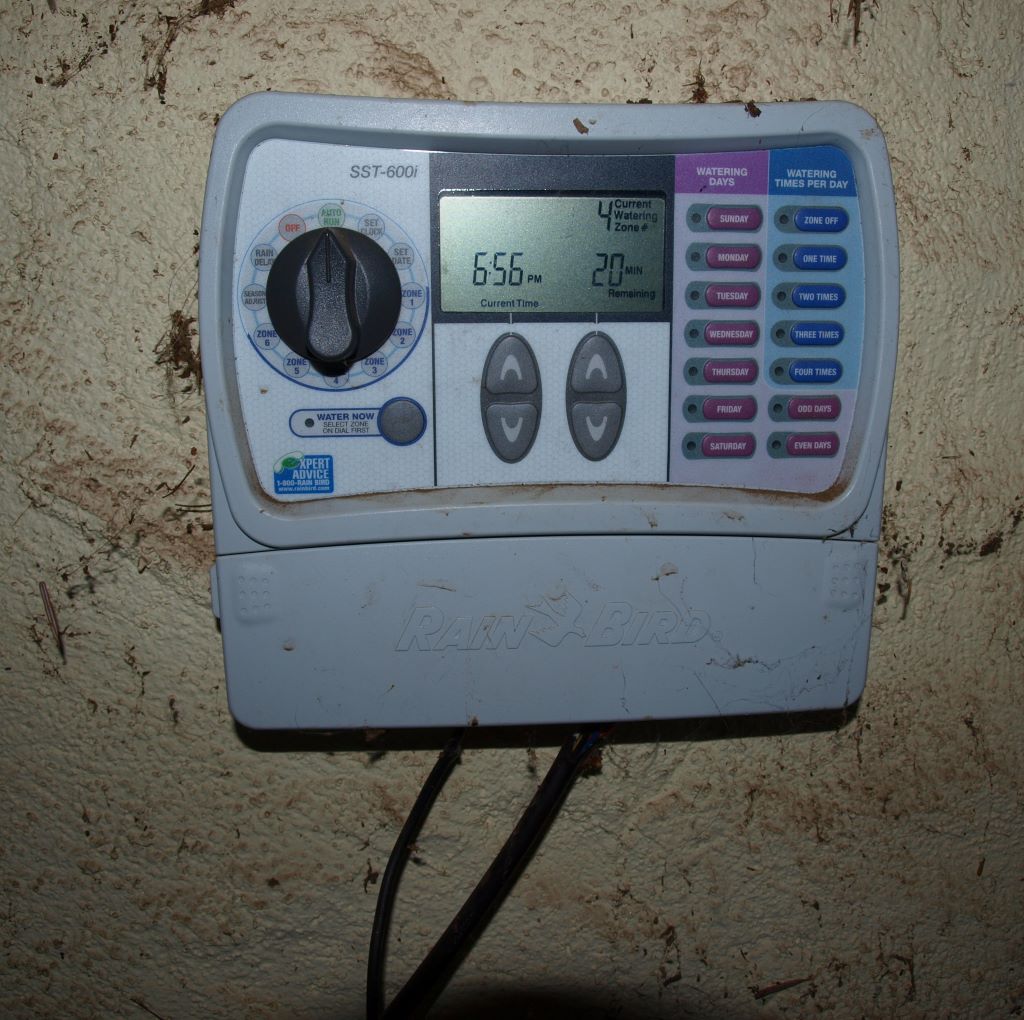
Irrigation controller
This is used to turn the water on and off at pre-determined times. This saves work and ensures the plants get the water they need, when they need it. It connects to the control valves via low voltage wires. Some types have a battery backup so you don’t lose programming information if the power goes off.
Control valves
Full automation requires a control valve for each watering zone. These are usually combined in a manifold that is placed near the water source and timer (usually in a box below ground). You can also have manual controls for any circuits you only use occasionally.
An extra control valve is usually added to the manifold to turn the water supply on and off at the same time as the chosen circuits. This ensures that water won’t be wasted if there are leaks anywhere in the system, or if a control valve get stuck open.
The valves run on 24 volts and are connected to the controller or timer with 18 gauge wire. The whole thing is very simple to put together and well within the capabilities on any reasonably competent individual (I’m electrically challenged but managed it without any problems).
Planning a drip system
How much water is required.
The first thing you need to know when planning your irrigation system, is how much water is required to water each bed. A general rule of thumb for watering vegetables says to give the plants an inch of water per week. Of course this varies according to the weather and soil type; a very light soil might require as much as 2”. It takes 0.6 of a gallon to cover a square foot one with one inch of water, which means that a hundred square foot bed would require 60 gallons of water per week.
When to water
It wouldn’t be a good idea to give your garden beds the full weeks supply of water at one time (much would probably be wasted and by the end of the week it would be very dry). It is much better to spread this out through the week. Some people irrigate every day, but I prefer to water every other day (or even every third day). To supply 60 gallons per week, would mean giving the bed just over 17 gallons every two days.
Number of lines
The number of drip emitter lines required for each bed, will depend upon your soil, but generally a 48” wide bed would usually have three lines. One down the center and the two others 8” in from the sides of the bed (16” apart). If a 48” wide bed was 100 square feet in area, it would be 25 feet long and would require 75 feet of tubing. If there is a dripper spaced every foot along the bed, this would mean 23 drippers per length or 69 altogether (starting and ending a foot from the ends of the bed). If the drippers put out ½ GPH that would be 34 gallons per hour in total. To get 17 GPH you would have to run the irrigation for a half hour.
Total garden needs
Of course to get your total water requirements, you need to add up the total number of square feet of beds. If you had six 100 square foot beds multiplied by 60 gallons per week, you would need 360 gallons of water per week, or 102 gallons every other day (assuming all of my math is correct). Whether you can supply this all at once depends upon the flow rate of your water supply.
Flow
The flow rate (volume of water) a pipe can deliver, depends upon its size, length and water pressure. The simple way to determine the flow rate from your tap is to time how many seconds it takes to fill a 1 gallon bucket and then divide that number into 3600 seconds (an hour). This will give you the number of gallons available in an hour, or GPH. The maximum flow rate for an irrigation line is generally considered to be 75 percent of this. It’s not a good idea to use a line to its absolute capacity right from the start, as you may want to add more drip line at a later date.
If your flow rate isn’t sufficient to supply 102 GPH this isn’t necessarily a problem. You can simply water parts of the garden at different times, or on different days. If we are watering on alternate days anyway, we can do half one day and half the next. However this does mean the garden would have to be divided into more than one zone.
If you don’t have a timer and control valves and are watering manually, you should have a timer which shuts off the water after a predetermined time. If you don’t you may forget and leave it on far longer than needed (you can waste a lot of water this way).
It is very useful (essential even) to have a shutoff for each bed, so you can shut off beds that don’t need watering and don’t have to water everything equally. This enables you to better tailor the watering to match the requirements of the plants, as well as save water.
Irrigation controller
This turns the control valves on and off at the preset times and allows you to forget about watering for long periods of time.
Save water
Drip irrigation is meant to save water, but when you water automatically this doesn’t always work out that way. It can be quite wasteful if you end up watering half empty beds, or after it has rained. To avoid this you need to keep a close eye on what is happening. You also need to put a manual shutoff on each bed, so you can cut water to it at any time. You can also get a rain sensor, which shuts off the irrigation after enough rain falls.
Installing a drip system
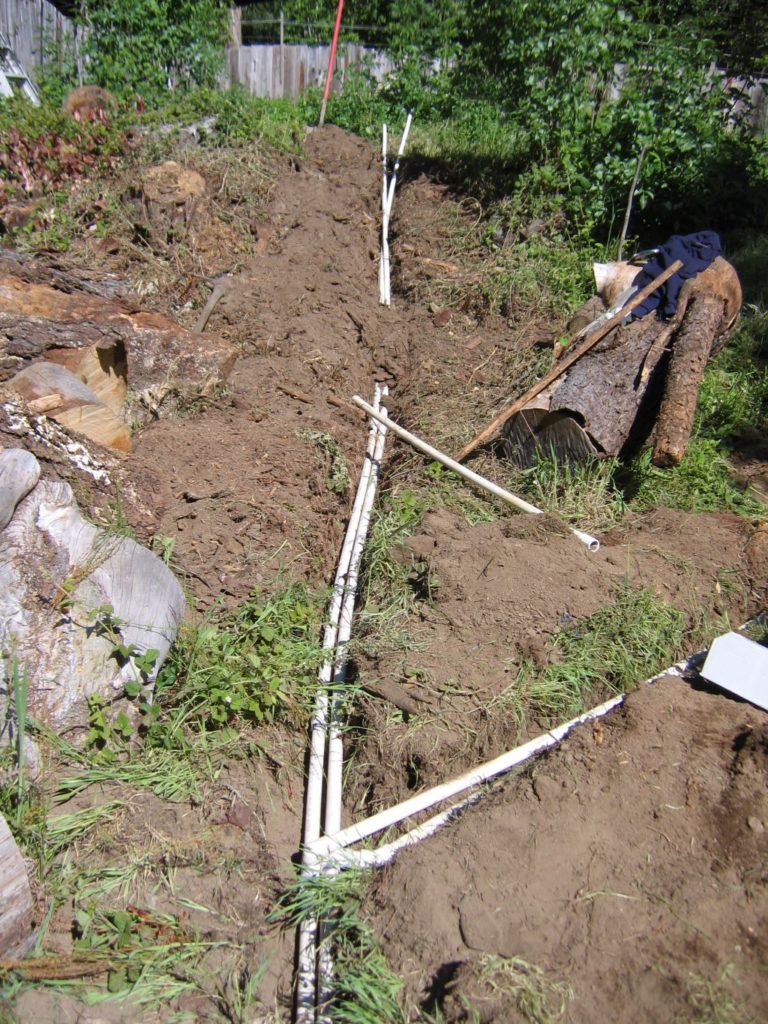
Trenching
Pipes for drip systems don’t have to be buried in trenches; they can run along the surface under mulch. These should be anchoring firmly though, so they don’t move around as water pressure changes, or get tripped over.
Even though it’s not essential, I prefer to bury the main supply lines underground, where they are less likely to get damaged. Run these to the main areas of the garden and put in risers as necessary. The main water pipe are usually buried 18” deep, with branch lines only 12” deep.
If you decide to bury your pipes then digging trenches should be an early priority. It’s a lot easier to build a path over a water line than it is to run a water line under a path. As I’ve mentioned before, any time you start digging you should be aware of the possibility of hitting buried water, gas or electric lines. Also try not to disturb the roots of important trees.
If you run the pipes along the edge of the paths, you will know where they are, and it will be easier to get to them if necessary. On a hillside you should run a line straight uphill, and tee off of it with lines across the contour (if you don’t refill these completely they can even do double duty as swales).
If you are hand digging a trench in hard dry soil, don’t waste your time chipping away at it. Just dig down a couple of inches along its entire length and fill the depression with water. When this soaks in it will make watering much easier. Dig out the moist soil and repeat the process as often as necessary (better yet do it in winter when the soil is moist).
It is important to make an accurate plan of where all of your buried water lines are located. This will simplify your life at a later date, or that of the next occupant of your garden.
Don’t refill any trenches until you have tested the system for leaks, otherwise it will be a nightmare to find any leaks. When refilling you should put all of the soil back in, even if it means leaving the trench as a slight hump. It will soon settle down to flat when the soil consolidates.
Assembly
I like to lay out all of the pipe and then glue it together (I don’t cut the last piece in each run, until I have glued everything else together, so I don’t make it too short. Incidentally you should never leave your glue can on unstable soil with the lid loose. I guarantee you will knock it over.
Assemble the backflow preventer, control valve, filter, and pressure regulator and any other control valves (make sure you install everything so the water flows in the right direction). Use teflon tape on any threads. The supply pipe then goes into this.
Unroll flexible polyethylene pipe carefully, don’t just pull it from the inside of the coil or it will never go flat. If it is very stiff you can leave it in the sun for a while to soften up. Soil staples will be a big help in holding it in place.
In very cold climates you need to be able to empty the system so that it doesn’t get damaged by freezing. The easiest way to do this is to have all of the pipes sloping downhill, so they can drain by gravity. You then just need screw off openings at the lowest and highest points. If you can’t use gravity, you will have to blow out the pipes with a compressor, which is more work.
When all of the system is fully assembled, you must flush out the pipes before closing the ends. This is very important, as if you leave any debris in the tubing, the only way it can get out is through the drippers and it will clog them. Never install the drippers until everything has been flushed thoroughly.
Using a drip system
A well functioning automated drip system does its job without your attention and tends to become almost invisible. However its big advantage (it doesn’t need your input) is also its biggest disadvantage, in that you can become less involved with watering the garden and so pay less attention to it. This can lead to you overlooking problems that need your attention.
When you first get your system going you must watch it carefully to make sure it is functioning properly. Watch for leaks whenever it is turned on (this isn’t easy if it is covered with mulch, so put this on later). Watch for wilted plants, which indicate water isn’t getting through to them. Also make sure it isn’t putting out too much water – wilted plants could be a sign of root rot from overly wet soil.
You will have to spend a little time learning to program your timer, but you need to become familiar with it. The system will work better if you can easily make any adjustments as needed.
The system will need some annual maintenance to keep it working well. If there is any possibility of freezing over the winter, you must drain the whole system in fall. In spring you should check the entire system, clean the filter and flush the supply lines before starting it up. Over the winter pipes can get broken or clogged, drippers can come loose and delicate parts like micro-sprinklers may cease to function properly.