


Bean, Scarlet Runner
Phaseolus coccineus
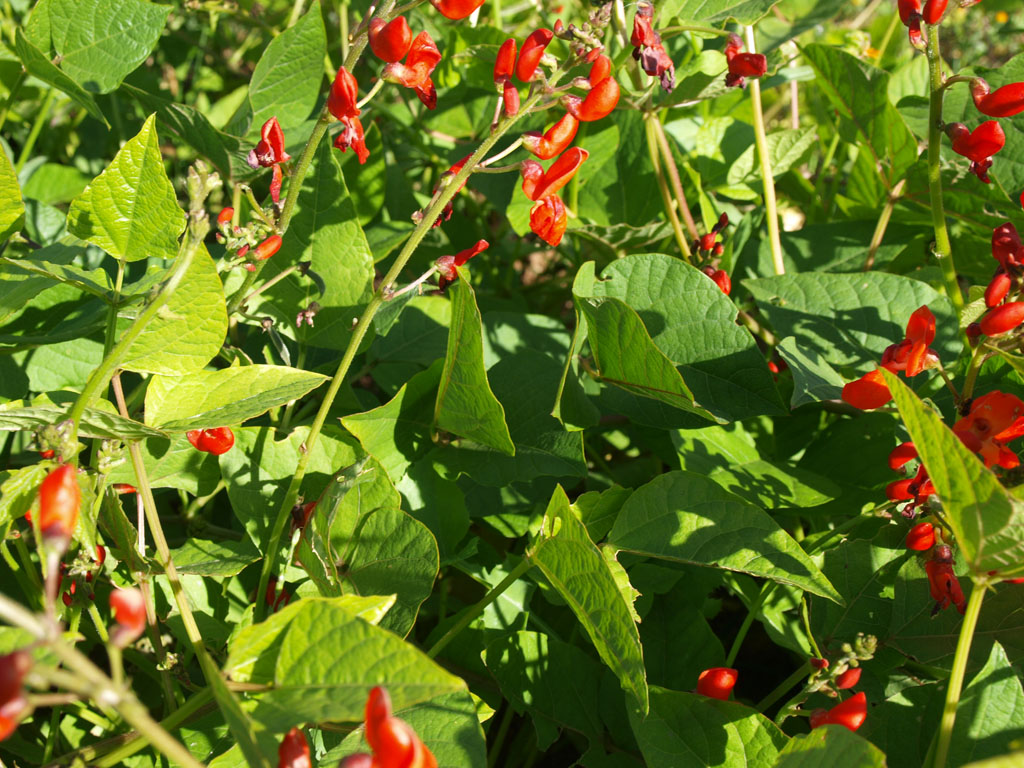
Introduction: This Central American bean has been grown as a crop for over 4000 years. It is a vigorous and easy to grow plant that is as ornamental as it is useful. It is the most commonly grown green bean in Britain, where it is more popular than bush or pole beans (which don’t grow so well in the cool climate).
Crop value: The scarlet runner bean can be eaten as green snap beans or as nutritious dry beans and tolerates cooler temperatures than most beans. It also produces beautiful red (or white) flowers that are very popular with hummingbirds and bees. All of these things make this a very useful crop for those aiming for more food self reliance. It isn’t very popular in this country, simply because people don’t realize its potential. However when people get to know it they tend to get very enthusiastic.
Nutritional content: The beans are rich in protein, soluble fiber (which can lower blood cholesterol) and complex carbohydrates.
Climate: Though a tropical plant, the scarlet runner is happy to grow in cooler conditions than most beans. It is very popular in the Pacific Northwest and Northern Europe, where other dry beans don’t do so well. They produce a lot more pods in cool weather and don’t actually like very high temperatures. Above 90˚F the flowers may drop off instead of setting pods.
Ease of growing: The scarlet runner bean really is one of the easiest beans (or any other plant for that matter) to grow. It’s large seeds quickly produce a vigorous plant and it doesn’t even need to be particularly warm.
| About Scarlet Runner Bean Seed facts Germ temp: 60 (80) 85˚F Germ time: 6 – 14 days Seed viability: 4 years Germination percentage: 75+ Weeks to grow transplants: 3 – 4 Planning facts Perennial Hardiness: Half hardy Growing temp: 50 (60 – 70) 80˚F Plants per person: 10 Plants per sq ft: 3 – 4 Transplants: Start: on last frost date Plant out: 3 – 4 wks after last frost Direct sow: 2 – 4 wks after last frost Days to harvest: 70 – 100 days Plant height: 4 – 10 ft Plant diameter: 12˝ Harvest facts Harvest period: 4 – 8 wks Yield per plant: 1 – 2 lb Yield per sq ft: 6 lb |
Soil
pH 6.0 ‑ 7.5
This plant prefers a well-drained, moisture retentive loam, with lots of organic matter. It can be grown in light soils if you add plenty of compost.
Soil preparation: Like most beans it doesn’t need a lot of nitrogen, but it should have good quantities of potassium, phosphorus and other nutrients. Dig 2˝ of compost into the top 10˝ of soil. You might also add a source of phosphorus, such as colloidal phosphate.
Planning
Where: Though this species is a perennial in the tropics, it is usually grown as an annual in northern climates, as it can’t survive cold winters. In cool climates it should be planted in a warm sheltered place (it is a tall sprawling plant and will suffer in windy locations). In hotter climates it may do better with light shade during the hottest part of the day.
A trellis covered in these plants will eventually turn into a solid wall of dense vegetation that casts a lot of shade. Obviously you should only put it where this won’t be a problem for other plants. It makes a good temporary screen.
When: The seed won’t germinate in cold soil (below 60˚F), so don’t plant out until 2 – 4 weeks after the last frost date. If you are in a hurry you can start them inside on the last frost date (the seedlings grow rapidly with all of the food in that big seed)
Support: I already talked about various support structures for pole beans in Beans, Bush and Pole and the same structures can be used here. The only difference is that the structure may have to be taller and stronger, to cope with the larger vines. Scarlet runner beans are very vigorous climbers and a mass of plants can grow tall and heavy.
Its best to install the supports before you plant the seeds. Don’t wait until the plants are growing (for obvious reasons – there is a danger of damaging the young plants).
When covered in flowering vines the support structure becomes a thing of beauty and you should take advantage of its ornamental value.
A few plants can be grown up tall existing plants, to add productivity and beauty.
I read somewhere that scarlet runner beans climb counterclockwise, whereas other beans climb clockwise. I don’t know whether this has any great significance, or whether it is even true for that matter (you shouldn’t believe everything you read in books).
Planting
Inoculation: If you haven’t grown this crop before, it will fix more nitrogen if inoculated with the appropriate nitrogen-fixing bacteria. See Beans for how to do this.
Transplants: Scarlet runner bean is sometimes started indoors in cell packs or soil blocks, to get an early start and to minimize bird and rodent damage.
The seeds germinate easily and grow rapidly in warm conditions, so often only need 3 weeks before they are ready to go outside. These should be started on the last frost date and planted out 3 – 4 weeks later.
Direct sowing: These plants don’t like cold weather and are not started outdoors until the soil has warmed up, 2 – 4 weeks after the last frost. Planted 2˝ deep, the large seeds germinate readily and quickly grow into vigorous seedlings. It is a good idea to plant a few extra seeds at the end of a row, to fill in any gaps where seeds don’t germinate.
Spacing: These tall plants are usually grown in rows because it is easier to erect a support structure for them. They can also be planted in a circle (6˝ apart) to grow up a teepee of poles. Sow the seeds 2˝ deep and 6 – 9˝ apart. Double rows (12˝ apart) also work well.
Care
Watering: For best production the plants need constant moisture. This is especially important when the pods are forming and in hot weather. Don’t allow the soil to dry out at these times.
Fertilization: These plants put on a lot of growth in a short time and will benefit from an occasional feed of compost tea or liquid kelp.
Mulch: This is helpful to keep the soil evenly moist and keep weeds down (which is important while they are young). Don’t apply it until the soil has warmed up.
Pruning: Some gardeners pinch out the tops of the plants when they get to the top of their supports. This is said to encourage the production of new side shoots lower down.
Pests: I have never had any problems when I have grown this crop, but it can be attacked by any of the pests that afflict pole beans. Gophers and groundhogs love the thick, nutritious roots.
Harvest: Begin harvesting the pods for baby green beans when they are a few inches long. You can also wait to gather until they reach full size, but before the seeds start to swell inside. As with pole beans, you need to harvest regularly to keep them producing well, so go over the plants every 2 – 3 days. If you find any old pods that you previously overlooked, remove them, as they can slow down flowering and pod production.
The immature full sized beans can be used like shell beans.
If you want dry beans just let the pod develop fully and turn crisp and brown on the plant.
Storage: Ideally the pods should be picked in the cool of morning or evening. You can store them in a plastic bag in the fridge, for a week or so (or until you have enough for a meal). For longer term storage freezing works best.
Seed saving: This is pretty much the same as with other beans. The flowers are very attractive to bees and hummingbirds and the former are the main pollinators. The seeds can also self-pollinate, but they still need to be visited by insects to trip them.
Because of their popularity with bees it is best to have only one variety flowering at a time within a half-mile. This essentially means only having one variety in your garden in a season, because they will keep flowering until frost cuts them down. Of course if you don’t care whether they cross you can have more than one. Have a red and a white flowered variety and you may see interesting differences in their offspring.
Unusual growing ideas
Ornamental: In this country these attractive vines are commonly grown purely as ornamentals. Often by people who don’t even realize that they are edible.
No support: This crop is occasionally grown without support, being allowed to sprawl and run along the ground.
Perennial roots: In mild winter areas the roots may survive the winter and sprout anew the following spring (then again they might not – I haven’t found them to be very reliable). In a suitably tropical climate they can grow for years and become a useful perennial crop (they were once commonly known as seven year beans). In temperate areas they aren’t usually worth growing as a crop for a second year, as the plants are so easy to grow from seed and so productive.
They are sometimes kept going as ornamentals for more than one year. Some cold climate gardeners dig the roots and store them like dahlias over the winter, for replanting the following spring.
Varieties
Most varieties have red flowers, but some have white, red and white, or even pink ones. The white types are considered to have the best flavored dry beans. In this country not many improved edible cultivars are available, though more are now appearing.
Scarlet Emperor (red flowers)
Painted Lady (red and white flowers)
Sunset (pink flowers)
Jacks Runner (white flowers)
Kitchen use
This versatile food plant has quite a variety of uses.
In England the immature pods are very widely used as green beans and many people say their flavor is superior to snap beans.
Older pods can be good too, but you have to cut off the strings on each side with a knife (they are so big this isn’t difficult).
The dry beans are good when cooked like pinto beans. The white types are a classic ingredient in Greek cooking and are known as gigantes.
The flowers are edible too and are often used to decorate salads.
| Gigantes 1 lb beans (soaked overnight) ¼ cup olive oil 3 cups chopped onions 1 cup chopped celery 3 garlic cloves, minced 2 quarts water 2 cups chopped tomatoes 8 tbsp tomato paste 3 bay leaves 2 tbsp fresh Greek oregano 2 tbsp fresh thyme 1 tsp red pepper Black pepper Salt Sauté the onions and garlic in the olive oil for 5 minutes, then add the water, beans, tomatoes herb and red pepper and bring to a boil. Then simmer until the beans are tender (don’t overcook or they go mushy). The length of time this takes will depend upon the beans, but start checking them after 30 minutes. |