


Beans, Pole and Bush
Phaseolus vulgaris
Introduction: The bean was first domesticated over 6000 years in Central and South America and its use had spread over much of North America before Europeans arrived. It is now a very important crop around the world, as beans are the most important source of protein for many people on earth (black beans, kidney beans, pinto beans and others). A number of other species also yield important beans crops (in the Phaseolus, Vigna, Vicia and Glycine genera), but this is the most important.
Beans are important to gardeners for another reason too, they (like most members of the Fabaceae) have a symbiotic relationship with nitrogen fixing bacteria. This means that beans can actually add nitrogen to the soil they grow in.
Pole Beans: These are the original beans and are generally more productive than bush beans because there is more photosynthetic area for food production (some may grow to 10 ft or more in height). They are also more interesting visually and take up less horizontal space in the garden. They also bear for a longer period and there is less damage from pests such as slugs. They are easier to harvest too. All of these features makes pole beans more useful for the home gardener than bush beans.
The big drawback to pole beans is that you have to give them something to climb up, which means an extra step (more work) in growing them.
Bush Beans: These were developed for commercial growers who didn’t want to have to support the plants. They tend to bear earlier than the pole types, though not so abundantly. They are more compact as a crop (only to 3 ft maximum) and easier to deal with.
| About Beans Seed facts Germ temp: 60 (80) 85˚F Germ time: 6 – 18 days 16 days / 59˚F 11 days / 68˚F 8 days / 77˚F * Optimum 6 days / 86˚F Seed viability: 3 years Germination percentage: 75+ Weeks to grow transplants: 3 – 4 Planning facts Hardiness: Tender Growing temp: 60 (70 – 75) 85˚F Plants per person: 10 – 20 Plants per sq ft: 9 Start in: on the last frost date Plant out: 4 wks after last frost Direct sow: 4 wks after last frost Succession sow: every 3 weeks Harvest facts Days to harvest: Dry beans: 85 – 115 days Green beans: 60 days Harvest period: 4 – 8 wks Yield per plant: 1 oz Yield per sq ft: ¾ lb green 1 oz dry |
Crop value: When gardeners talk about beans in the garden they usually mean green beans, but these plants have a lot more to offer than a green vegetable. From a self-sufficiency standpoint few crops can match the dry beans. They are tasty, easy to grow, drought tolerant, need little attention, enrich the soil they grow in, are easy to process and prepare and can be stored for several years. What more could you ask for in one crop?
A large bean patch enables you to produce a nutritious high protein food with relatively little effort, and give you one of the best ways to increase your self-reliance.
Ease of growing: Beans are an undemanding crop and do well almost everywhere, so long as it isn’t too cool. You have to really work at it to fail with beans.
Nutritional content: Green beans are rich in iron, potassium and silicon and well as a multitude of antioxidants. They contain about 140 calories per pound.
Dry beans are rich in protein, soluble fiber (which can lower blood cholesterol levels), complex carbohydrates, thiamine, niacin, folate, calcium, iron, magnesium, phosphorus and potassium. They contain about 1400 calories per pound.
Beans are
somewhat deficient in the amino acid methionine, which is why they were
traditionally eaten with methionine rich corn (2 parts corn to one part beans).
Beans also contain a trypsin inhibitor, but this is destroyed by heat (which
is why beans must be cooked to make them fully edible).
Climate: Beans are very much a warm weather crop and prefer a growing temperature between 70˚F – 85˚F. They grow poorly below 60˚F (cool wet weather also encourages various diseases). On the other hand they don’t like intense heat. Temperatures above 85˚F can slow growth and cause flowers to drop rather than setting pods (especially if they are stressed by lack of water too).
Soil
pH 6.0 (6.5-7.0) 7.5
Beans grow best in a light, well-drained loamy soil (not too heavy), with lots of organic matter. It should be fairly fertile for best growth, and also fairly neutral.
The soil doesn’t have to be very rich in nitrogen as they can fix their own. In fact they won’t do this is nitrogen if it is already abundant in the soil. However it should have good quantities of potassium, phosphorus and other nutrients.
Beans are sometimes planted after a crop that was heavily manured, or after a winter cover crop.
Soil preparation: Incorporate any amendments into the top 6˝ – 8˝ of soil, as this is where most of the plants feeder roots are located. Beans dislike acid soil, so add lime if necessary, or wood ashes (beans love wood ashes).
Inoculation: It is important to understand that the bean plants themselves don’t fix nitrogen. They simply play host to nitrogen fixing Rhizobium bacteria that live in nodules on their roots. If the right strain of bacteria isn’t present in the soil, no nitrogen will be fixed and the bean plants will take it out of the soil for their own use, just like any other plant.
If you have grown beans in the past 3 – 5 years, there are probably enough bacteria already in the soil for good root nodulation and you don’t need to inoculate. If you haven’t grown them recently, you can ensure it is available by inoculating the seeds with the appropriate bacteria. This greatly increases nitrogen fixation and can boost yields by as much as 60%.
Inoculant is a living organism and doesn’t last indefinitely. For best results keep the packet in a cool dark place and use it before its expiration date.
How: The simplest way to inoculate the beans is to moisten them with water (some people add a little molasses to the water to help the inoculant adhere) and then roll them in the inoculant powder. Some gardeners then roll the inoculated seeds in bone meal, or colloidal phosphate, supposedly to supply phosphorus and to protect the inoculant.
Planning
Where: Beans are fairly tender plants and prefer a warm sunny spot. Tall pole beans are vulnerable to being blown over, so should be sheltered from high winds. Bush beans are less demanding and are often interplanted between slower growing, but more space hungry crops.
When: Beans originated in the tropics and can’t stand cold weather. If the seeds are planted in cold soil they will often rot before they get around to germinating. Don’t plant them out until all frost danger is past and the soil is warm (60˚F is a minimum and 80˚F is much better). This may be 4 weeks after the last frost date.
If you want to get an early crop, you may have to warm the soil beforehand, with cloches or plastic mulch (and possibly start them inside). Raised beds also help because they warm up faster than flat ground.
Succession sowing: Beans can produce a lot of food in a short time, especially the bush types. This is fine for dry beans, or if you plan on freezing them for later use, but can also be a problem. For fresh eating you really want a modest and continuous harvest, preferably over a long period of time.
The way to get a sustained yield is to sow small quantities of plants in succession every 2 – 3 weeks, until mid summer. Pole beans bear for a longer period than bush beans, so can be sown less frequently.
To grow dry beans you plant them all at once, as soon as the soil is warm enough. They need a longer period of warm weather for the green pods to mature into dry beans. They are not at all hardy and any frost will kill them.
Planting
Pre-planting treatment: In warm weather some people soak the seed overnight prior to planting (this is not a good idea if the soil is cool). The best way to do this is put the seed on a wet paper towel, so they can absorb the moisture at their leisure. Submerging them in water may cause them to absorb water too quickly and can apparently cause problems.
A good way to improve germination in cool conditions is to pre‑sprout the seeds indoors. The seed can then germinate in optimally warm conditions and could save you 10 days or more. You then plant out the already germinated seeds, being very careful not to damage the tender roots. Don’t forget to inoculate them.
Starting indoors
You usually only start beans inside if you need to get them started early, or if you want to avoid hungry early birds. Growing beans from transplants is a lot more work than direct sowing and they dislike the root disturbance involved, If the soil is warm enough the large seeds germinate and grow so fast outdoors that direct sown plants often catch up to transplanted ones anyway. It always surprises me to see six packs of bean plants for sale in the garden center when it is better, cheaper and just as easy to direct sow.
How: Start the seed indoors in soil blocks or cell packs (they don’t like root disturbance so avoid flats). If the germination percentage of the seeds is high, sow one seed in each cell. If germination is not so good, plant two seeds and thin to the best one after they have both germinated. Don’t forget to inoculate them.
Direct sowing
Beans are usually direct sown as it is a lot less work than transplanting. This is particularly important if you are sowing a large area for dry beans.
How: Pole beans are best sown in long rows down the bed, as it’s easier to support them. Simply make a furrow at the required depth, lay your seeds evenly in the bottom and pull the soil back into the furrow. Of course you can also plant them around whatever supports you have provided, using a similar method.
Bush beans are usually planted in offset rows across the bed, an equal distance apart. I start by placing the seeds on top of the prepared seedbed, at the correct spacing. When I am satisfied that they are all correctly spaced, I simply push them down into the soil with my finger and close up the small hole. Of course the seeds should be inoculated as described above.
Depth: The depth of planting varies according to the soil temperature and moisture content. They should be planted 1˝ deep in cold, moist soil and 2˝ (or even 3˝) deep in warm, dry soil. The deeper planting ensures they get enough moisture.
Thinning: It is common to sow roughly twice as many seeds as you need plants and thin to the approximate spacing after they have all emerged. The best way to remove the extra plants is by pinching them out as this doesn’t disturb those remaining. Always remove the inferior plants and leave the best ones (obviously!).
Spacing: The biggest factor in determining spacing is whether they are bush or pole varieties.
I have given a range of planting distances because it varies with circumstances (soil fertility, moisture availability). A close spacing means more plants, but each one will be less productive than at a wider spacing. Beware of overcrowding which can result in poor air circulation and possible disease problems. You need to experiment a little to find the ideal spacing for your plants.
Bush: Space the plants 3˝ to 5˝ apart both ways in the beds. If you want to grow in rows then put them 4˝ – 6˝ apart, with 18˝ between the rows
Pole: These are best grown in rows, down the middle of the bed, as this makes it easier to support them (you can interplant a low growing crop in the vacant space). You want the plants to be 3˝ – 6˝ apart, with 18˝ between the rows. You could also space them like bush beans, 6˝ to 8˝ apart in offset rows across the beds, but this makes them harder to support.
If you plan on using a teepee of poles for support, then plant 4 – 6 seeds around each pole. When these have germinated, thin to leave the best 3 – 4 plants at each pole.
Care
Beans are pretty easy plants to grow and most of the care they need is in watering and weeding when young. Native Americans sometimes used to leave their plants for weeks at a time to pretty much grow themselves.
Weeds: Young bean plants can’t compete with weeds very well, so it’s important to keep down weeds initially. They are quite shallow rooted, so be careful not to damage them if you use a hoe. Widely spaced pole beans may benefit from a mulch to keep weeds down, but bush beans cover the soil pretty well by themselves.
Water: A lack of water in hot weather will affect the set of the pods, so make sure they are well watered at this time. The most critical time is when they are flowering and sizing up their pods. Keep the soil evenly moist, but don’t over water as this can lead to disease problems.
Try and avoid wetting the leaves when watering, as mildew and fungus diseases can be spread in this way. The best way to irrigate is with drip or soaker hose.
Dry beans are quite drought tolerant and do well as a dry farmed crop, (grown with no irrigation), though yields will be slightly lower. The plants should be spaced further apart, to lessen competition between plants and to give their roots more soil to extract water from. Try spacing them 9 – 12˝ apart and see how it works.
Fertilization: Bush beans don’t usually need feeding, as they aren’t in the ground for very long. Pole beans may benefit from a feed of compost tea or liquid seaweed, every 3 – 4 weeks. This is particularly helpful when they start to flower.
Pollination: Beans are generally self-pollinated, so it usually happens pretty much automatically. However if the temperature is much above 85˚F the flowers may drop off instead of being fertilized.
Mulch: This is often used to cover the soil under widely spaced pole beans, as it conserves moisture and keeps down weeds. Don’t apply it until the soil is warm though. Bush beans tend to cover the ground pretty effectively and don’t really need it.
Support
Pole beans often reach 8 feet or more in height so need a sturdy support. This should be put in place when planting, so you don’t damage the growing seedlings.
A good support is a teepee of tall sturdy wooden or bamboo poles. Use poles at least 8 ft long and tie them together at a height of about 5 ft, so the tops spread out and the plants don’t get so congested. Their height really depends on how vigorous your beans are.
Another good trellis can be made with pairs of tall poles, 2 ft apart at the base. A row of these is connected at the top to a long crossbar. I’m not sure I’m explaining this very well, but look at the picture.
An arch can be made by planting two rows of supple poles (willow is good) and bending over and tying the tops. These are then connected with long crosspieces to tie the whole thing together.
One of the easiest field scale supports (for large plantings) consists of 8 ft metal T posts, with a ¼˝ nylon rope at the top, supporting horticultural netting (or chicken wire netting).
Many other kinds of supports can be devised for supporting pole beans. chicken wire, bamboo canes, hog fencing and string have all been used. I like to use wire fencing, simply because its less work than most other arrangements.
Whatever you use should have a fairly rough texture so the plants can get a grip and twine around (if it is too smooth they may slip down). It is also important that the support is strong enough, as the total mass of vegetation can get quite heavy.
Pea sticks (see Peas) are another easy solution that doesn’t require you to buy anything.
Three Sisters
The traditional Native American support for beans was corn or sunflowers. This was a good solution for a pre-industrial people who didn’t have access to string, wire or metal tools to cut poles. They simply grew the supports they needed and obtained food from them at the same time.
If you want to try this, you must make sure the corn has made enough growth, so that the beans don’t overwhelm it.
They also planted squash to cover and make use of the open ground between the corn hills. This very efficient growing system was known as the three sisters and was widely practiced by many tribes. See Corn for more on this.
Problems
Pests: Though beans are an attractive food source for many creatures (especially in warm weather), they are pretty vigorous plants and are rarely seriously affected by most pests. A young plant can lose as much as 50% of its leaves and still recover completely.
Mexican Bean Beetles: These are a potentially serious pest and can quickly get out of control (watch for their yellow eggs). A traditional remedy was to interplant with potatoes, garlic or nasturtium, but I can’t vouch for their effectiveness. Hand picking works well for small numbers of plants.
Cutworms: Will often go for the emerging seedlings. See Cabbage for ways to deal with them.
Aphids: If these are a problem, blast them with a jet of water.
Other pests: Bean leaf beetle, bean weevils, wireworms, leafhoppers, tarnished plant bugs, leaf miners, flea beetles, mites, cucumber beetles, green stink bugs, whiteflies and caterpillars.
Birds and mice will often go for the newly planted seed, or seedlings, especially in spring. Net the beds and / or get a cat or dog.
Disease: In areas with lots of summer rain beans are prone to a number of bacterial, fungal and viral diseases.
You can reduce the incidence of disease problems by careful rotation. Clean up crop debris after harvest (or incorporate into soil). Avoid poorly drained soil, give the plants good air circulation and watch for disease vectors such as aphids and leafhoppers. Also choose resistant varieties when available.
Anthracnose, halo blight and bean mosaic are serious diseases and may be seed borne, so watch out where your seed comes from and discard any unhealthy looking seed.
Bacterial blight, leaf spot, curly top virus, downy mildew powdery mildew, white mold and rust can all be a problem under certain conditions. It is important to keep the foliage dry and don’t work around the wet plants.
Frost: Bean plants are very tender and are usually killed by frost. Don’t plant until after frost danger is past and harvest before frost kills the plants (or cover to protect).
Harvesting
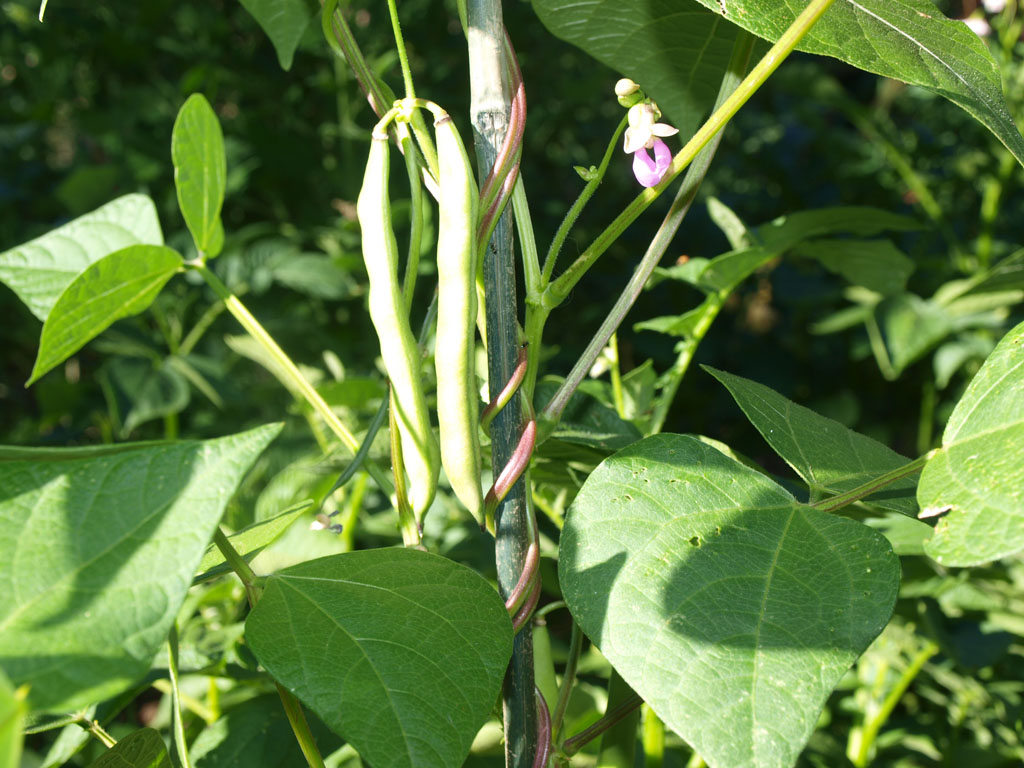
Snap beans (Haricot Vert)
When: The pods take 18 – 21 days to go from pollination to full size. They are best gathered just as they are reaching full size, but before the beans start to swell. They should still snap in half easily. Many people prefer them when they are just slightly smaller in diameter than a pencil. You might try harvesting the pods at different sizes to see which you like best.
If you get them early enough, you can eat the immature pods of many dry bean varieties as snap beans, (they may have strings though).
How: The best time to harvest is in the early morning when it is still cool. Gather the pods carefully so you don’t damage the plants. Hold on to the vine and pull down on the pod, so there is no danger of pulling the plant out of the ground.
The best way to harvest older beans is to break off the bean just below its stem and then break sideways and pull, leaving any strings attached to the plant. In humid areas it’s not good to harvest while the foliage is wet, as this can transmit disease.
You must gather the green beans conscientiously whether you want them or not, as the plants may stop producing when seed starts to ripen. If you harvest pole beans every 2 – 3 days, it is possible to keep the plants producing for weeks.
The key to large harvests is early and regular picking (just like life, the more you take the more you get).
If the harvest gets away from you, remove all the pods of any size. With luck this will encourage a new growth of pods.
Shell Beans
These are harvested as soon as the beans reach full size (4 – 8 days after the pods reach full size), but before they toughen up.
Dry Beans
After the green pods and shell beans we get to the dry beans, which is the final stage. All beans can be used as dry beans, but those grown for their pods tend to be smaller than those grown specifically for dry beans.
When: If you live in a warm and dry climate the beans can be left to dry completely on the vine. They are gathered after the pods are dry and leathery and you can hear the seeds rattle inside. Farmers start harvesting when the moisture content drops to 18%.
How: You can gather small quantities of pods individually, but this is a little time consuming to be practical for larger harvests. If you have a large area of beans pick the whole plants and lay them on a tarp to dry.
If the climate is uncooperatively wet and cool you may have to cut whole plants and hang then in a warm dry place to mature and dry out. Slightly immature beans will ripen fully even after picking (and turn the right color).
Threshing: If you have a large quantity of beans they can be threshed (removed from the pods) by walking on the dry plants, by using your hands (you may need gloves for protection), or by banging the plants inside a barrel. You then need to separate the beans from the chaff (pod debris). A blower or compressor can quickly blow away the chaff and leave you with clean beans, ready for use.
Dry means dry: The threshed seeds must then be dried thoroughly (until they have 15% moisture or less) before storage. A completely dry bean is so hard it will shatter when crushed. If you can make a mark with your fingernail it isn’t dry enough. A simple way to see if the beans are dry enough is to put a few in a closed jar for a few days. If condensation forms on the inside of the jar, they still contain too much moisture.
If there is any possibility that weevils may have got to your beans, you should freeze them for a couple of days (24 hours is probably long enough) to kill any eggs, larvae or adults. After this treatment they should probably be dried again (they may pick up moisture) before long term storage.
Storage: Green beans may be stored in plastic bags in the fridge for a few days (this may be necessary if your plants are producing less or more than you can use at one time). For longer storage they can be dried, pickled or frozen. Shell beans can also be frozen.
Fully dry beans store very well in a cool airtight container and will stay edible for several years (thought they are best when eaten within 12 months).
Seed saving: Beans are among the easiest crops to save seed, you just grow them like dry beans. They are mostly self-pollinating, though insects may cause some cross-pollination. For this reason it is best to have only one variety flowering at a time if possible. If this isn’t possible you should separate them by growing a bed of other plants in between.
Be aware that some viruses may be transmitted through the seed and try not to gather from diseased plants.
If you choose seed from the best yielding and earliest plants you can create your own specially adapted strain for your garden.
Unusual growing
ideas
Field scale: Dry beans are a crop that just begs to be grown on a larger scale. The more beans you plant, the more beans you harvest and the more beans you eat (thus helping greatly with your self-reliance.
Henry Thoreau’s’ book Walden contains an interesting account of growing beans as a cash crop on a small field scale.
Varieties
Beans are commonly divided into green (snap), shell and dry beans, with both bush and pole types for all of these. This somewhat arbitrary division is somewhat complicated by the fact that many varieties can be used in more than one way. For example some dry beans can be used as shell or green beans and vice versa.
Other differences mainly involve the final use of the beans, whether they will be used as dry beans, shell beans or green beans.
Snap Beans: Also known as string beans, French beans or green beans, they are a mainstay of the traditional vegetable garden. Most modern varieties don’t have strings, which is why they are no longer referred to as string beans. Good varieties include:
Bush: Golden Wax, Jade, Provider, Romano, Royal Burgundy, Tendergreen.
Pole: Blue Lake Pole, Kentucky Wonder, Romano
French Filet beans (Haricot Verts): These are some of the best quality varieties of snap bean. The pods are harvested when very small (¼˝ diameter or less) and tender.
These varieties are all outstanding:
Bush: Fin De Bagnol, Nickel, Royalnel, Triomphe de Farcy,
Vernandon.
Pole: Emerite, Fortex
Shell Beans Flageolets): Sometimes called shelly beans, these are gathered when the beans reach full size, but before they start to harden and mature. The soft beans are shelled out and cooked.
Lows Champion, Vernel
Dry Beans (Haricots)
These are unsurpassed from a nutritional and self-sufficiency viewpoint, as they are a major source of easily stored protein, as well as a great low work crop. Of course dry beans are also relatively cheap to buy (they lend themselves to mechanization), so may not be worthwhile to grow unless you have a lot of space.
Kidney beans, pinto beans, black bean, Swedish beans and navy beans are all simply different varieties of the same species. There is a mind boggling number of bean varieties out there and I won’t even try and recommend any varieties. I will just say the following have all worked well for me.
Bush: Anasazi, Black Turtle, Borlotto, Hutterite Soup Bean, Tigers Eye.
Pole: Cherokee Trail of Tears, Hidatsa Shield Figure
Kitchen use
Green beans: Trim the tops and bottoms off the pods and steam (or boil) them for a few minutes.
Flatulence: You can’t really talk about using dry beans without mentioning their unfortunate tendency to cause flatulence. This occurs because they contain various polysaccharides (complex sugars) that aren’t easily digested in the small intestine because we lack the appropriate enzymes. Consequently they pass through into the colon, where they are broken down by various types of bacteria. In the process these produce the smelly gas (a mix of hydrogen and methane).
This problem can be reduced by soaking beans and discarding the water before cooking. You can also change the water once or twice during cooking. Fresh beans are less of a problem than old ones. Also don’t add salt until they are cooked (this also makes them tougher anyway). If you eat beans a lot your body may become more adapted to eating them, so this becomes less of a problem.
The fungus Aspergillus niger contains the enzyme alpha-galactosidase, which breaks down these polysaccharide sugars in the small intestine. This is available commercially under the name “Beano”. I can’t say I’ve ever felt the need to try this though.
The fastest way to soak beans is to bring to boil for a few minutes and then leave to soak for an hour (it would take at least 4 hours in cold water). Then rinse and cook in fresh water,
When using beans in a recipe it is usual to cook them separately and then add other ingredients. Don’t cook everything together from the start.
| Refried Beans Refried beans aren’t really fried twice (or even once), it is simply a mistranslation of reheated beans. 1 ½ cups cooked beans 2 tablespoons olive oil Salt Lime juice 1 teaspoon oregano There isn’t much preparation, simply mash the beans and add the rest of the ingredients and heat. The prepared beans will keep in a container in the fridge for up to a week. You can also add onions, peppers and other flavorings. |