


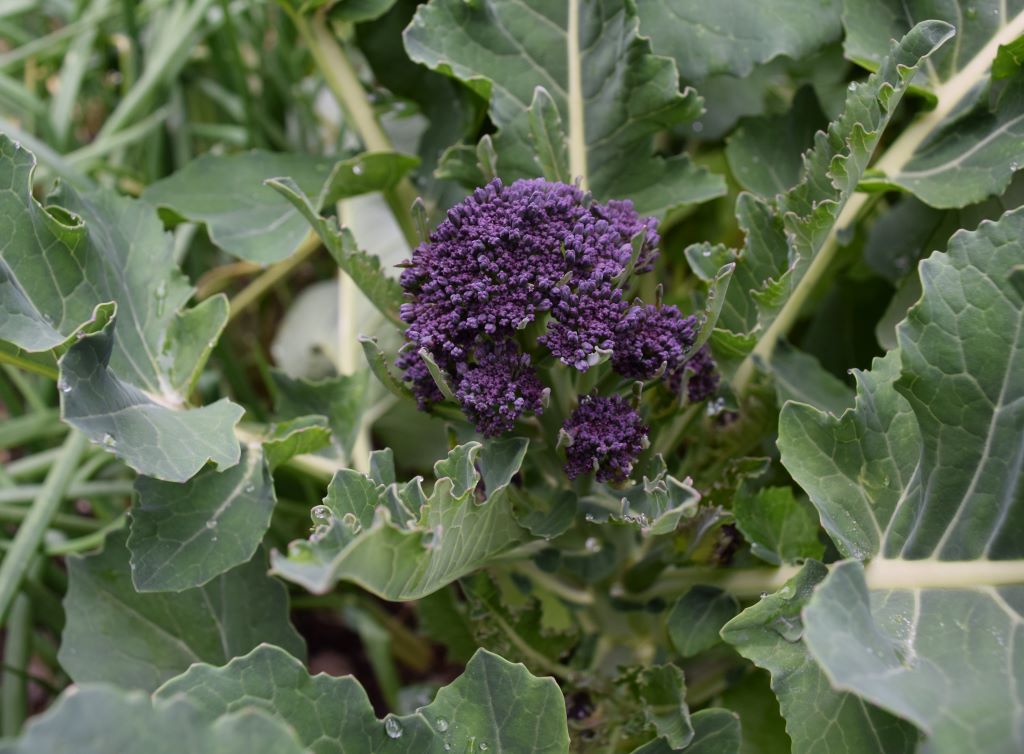
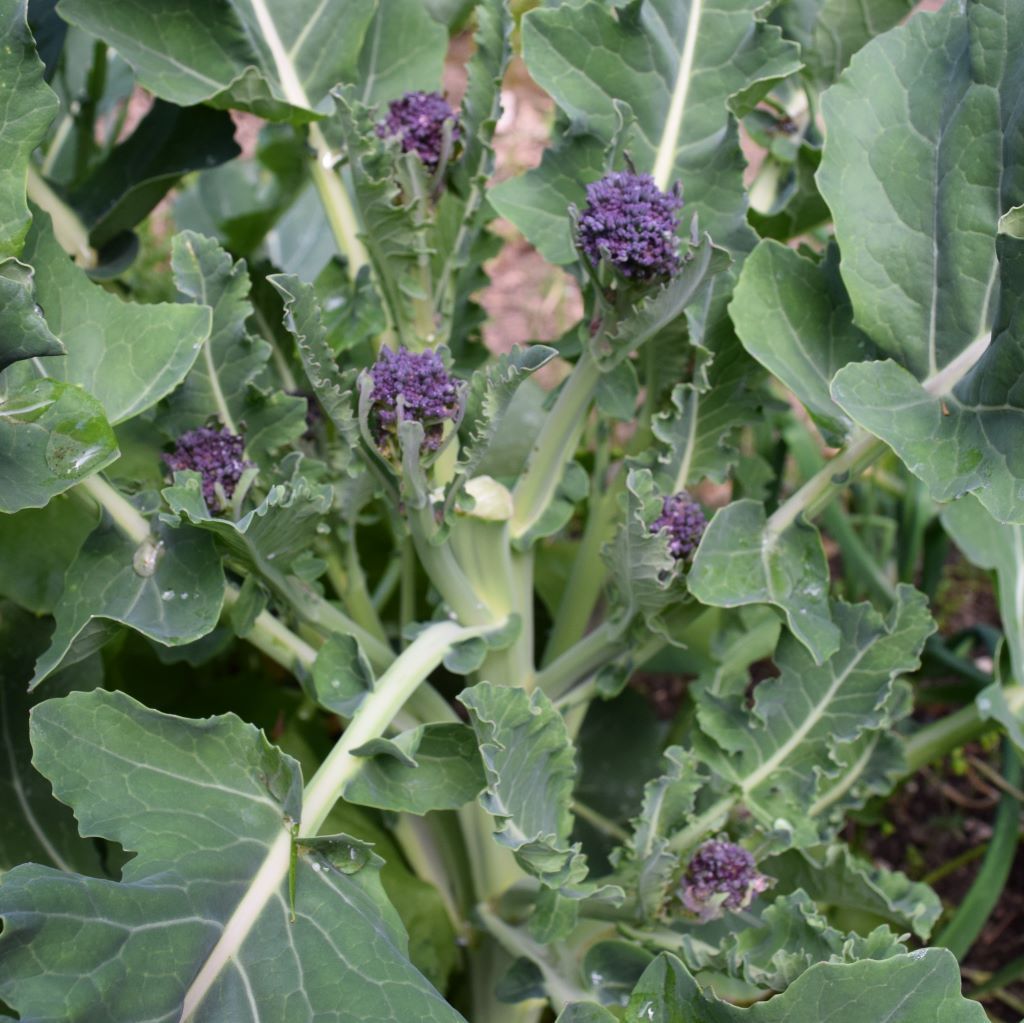
Sprouting Broccoli
Brassica oleracea var alboglabra
Introduction: When old British gardening books talk about broccoli, they often meant Sprouting Broccoli), which is not the same as conventional Italian Broccoli, in that it produces many small heads or shoots, rather than a single large head. Before the arrival of Broccoli fro Italy, it was an important British winter crop, but its use has declined significantly in recent years. This is unfortunate, because it is much hardier than Broccoli and can be a valuable late winter / spring crop.
Ease of growing: Sprouting Broccoli is pretty easy to grow, if you plant it at the right time (and give it plenty of water and nutrients). The biggest problem with growing it is finding seed to plant.
Nutritional content: This is just as nutritious as its better known cousin, which is rich in vitamins A and C, calcium, iron, potassium and folate, as well as a whole range of beneficial phytochemicals, glucosinolates, luteine sulfuraphane, myrosinase and isothiocyanin.
| About Sprouting Broccoli Seed facts Germ temp: 45 (60 – 75) 85˚F Germ time: 4 – 20 days 20 days / 50˚F 9 days / 59˚F 6 days / 68˚F 5 days / 77˚F * Optimum 4 days / 86˚F Seed viability: 3 – 4 years Germination percentage: 75+ Weeks to grow transplants: 4 – 5 Planning facts Hardiness: Hardy Growing temp: 60 – 65˚F Plants per person: 3 Days to harvest: 90 – 150 days Planting Fall crop: Direct sow 8 – 12 wks before first frost Harvest facts Harvest period: 2 – 6 wks Yield per plant: 1/2 lb |
Soil
pH 6.0 – 7.5
This plant needs a rich, moist, well-drained soil with lots of organic matter and available nutrients. It is quite salt tolerant.
Soil preparation: Prepare the soil by incorporating 2 – 3˝ of aged manure, or compost, into the top 6 – 8˝ of soil (which is where most of the plants feeder roots are found). You might also add a handful of organic fertilizer mix (or a mix of colloidal phosphate, wood ashes, kelp and dolomitic limestone). It likes lots of calcium and magnesium and doesn’t like acid soil.
Planning
Where: Sprouting Broccoli should be planted in a sheltered place with full sun, as it will be growing through the winter. It shouldn’t be planted where another Brassica has grown in the past 3 years.
When: Sprouting broccoli prefers fairly mild growing conditions (55 – 75˚F.) It s often said that it needs exposure to cold weather (below 50˚F) before it will head up, which if true means it won’t work as a spring crop. It is hardier than broccoli and is commonly sown in the fall, for a spring crop.
Planting Transplants
Starting inside: Like most Brassicas, Sprouting Broccoli doesn’t mind transplanting, so can be started in flats, cell packs, soil blocks or plug trays. Start the seeds indoors 4 weeks before you want to plant out. Sow them in a flat, 1˝ apart and ⅛ – ¼˝ deep and when they have all germinated prick out the best ones into another flat, spacing them 2˝ apart. By the time they go outside, the plants should be 3 – 4˝ high, with 3 – 5 leaves and a stem diameter of less that ¼˝.
Planting out: Set out transplants slightly deeper than they grew in the flats, up to the depth of their first true leaves.
Starting outside: The transplants can also be raised outdoors in a nursery bed in late summer. The seeds are sown in a small, protected area, pricked out into a slightly larger area and finally transplanted to their permanent position. This is a much more efficient use of space than direct sowing at their final spacing, as they don’t take up much bed space for the first month or two of their lives.
Direct sowing: This crop can be direct in late summer. Sow twice as many seeds as you need plants, at a depth of ¼ – ½˝. Thin to the required spacing when they have their first set of true leaves. Of course you will probably have problems with pests when direct sowing in warm weather, so be vigilant.
Spacing: The spacing you use depends on the fertility of the soil and how large you want the plants to grow.
Rows: When planting in rows give them 12 – 18˝ between plants and 36˝ between rows.
Beds: The spacing in beds will depend upon the soil, from 12˝in very good soil, to 18˝ in poor soil.
Care
Weeds: Keep the plants well weeded, especially when small.
Water: This plant needs quite a lot of water, so for optimal growth the soil must be moist at all times (and especially when the heads are developing). Fortunately it is generally grown in fairly cool weather, so watering isn’t usually a problem.
Fertilization: If your soil is less than ideal, give your transplants a feed of compost tea, or liquid seaweed 2 weeks after planting out. This will encourage early vegetative growth. You might also give them another feed a couple of weeks before harvest time, to encourage maximum growth and production of side shoots.

Problems
Pests: This member of the cabbage family is prone to the same multitude of pests and diseases. These include aphids, cabbage worms, loopers, diamondback moths, root maggots, flea beetles and more (see Cabbage for more on these). You can avoid many of these problems by covering the young plants with row covers.
Cutworms: If you find whole plants laying on the ground, severed at the base, cutworms are usually responsible. Dig in the soil around the fallen plant and you will usually find a small, dark, curled up caterpillar). If you find it you can prevent it killing other plants.
Cutworms can be a real problem for young seedlings in spring. A good solution is to wrap the stems in individual cutworm collars, made of cardboard, newspaper (2 layers) or aluminum foil. These should go 2˝ into the soil. You can also use a bottomless paper cup to surround the whole plant.
Aphids: These are the ever-present pests of Brassicas. Blasting them off with a strong jet (I mean strong) of water makes a big difference. It also pays to have lots of insectory plants (Phacelia, Asteraceae. Apiaceae) around to feed the predators that prey on aphids.

Caterpillars: Several types of caterpillar live only on the various Brassicas and can strip a young plant to the midribs in a short time. It is important to keep an eye out for these, so you can deal with them before they devastate your crop.
If you have only a few plants, hand picking is the best way to go. If you have a whole field then a spray of BT (Bacillus thuringensis) is usually recommended. Parasitic wasps can kill a lot of caterpillars if given the chance, but not if you start spraying poisons. Red cabbage is not as attractive to caterpillars as the green, though it is more attractive to aphids. If they are really bad you might also go after the conspicuous white butterflies with a butterfly net.
Flea Beetles: These tiny insects are common in spring and eat small holes in the leaves of the young plants. Transplants can usually take this damage without too much problem, they will just put out new leaves, but newly germinated seedlings may be killed. If they are a big problem you could use row covers, or plant some turnip seed as a trap crop.
Cabbage Root Fly: This is probably the worst Brassica pest. It lays its eggs at the base of the plant and the newly hatched larvae work their way down to the roots and eat them. If they are numerous enough they pretty much destroy the roots and kill the plant. The first warning sign is when a plant wilts in sunny weather. If this occurs, examine the root for the small white maggots, which look like small grains of rice. If you find affected plants, remove and kill the maggots to stop them maturing and reproducing (or just to make you feel better).
The easiest way to deal with these pests is to use row covers, which prevents the fly getting near enough to the plant to lay eggs.
Another effective control is to use 6˝ squares (or disks) of foam carpet backing. You cut a slit to the center of the square and put them around the stem. These work very well, because the foam can expand as the stem enlarges. These disks not only make it harder for the fly larvae to get into the root, but also provide refuges for the predatory beetles that eat the eggs and larvae. These disks have achieved 70% control, which is as good as most pesticides.
The flies prefer Chinese cabbage and will lay their eggs near it, in preference to cabbage. You could plant these near your cabbages as a trap crop.
You don’t have to eliminate all of these maggots. Some damage is tolerable, so long as it doesn’t seriously affect the crop.
Other pests: Harlequin bugs, thrips, root knot nematodes, slugs and snails.
Birds: These will sometimes eat seedlings, especially in spring. If this is a problem you may have to net the plants (row covers used to prevent other pests will also work). In my garden quail are a problem for Brassicas year round, but particularly in winter. They love to eat the leaves and will tear them to shreds (sometimes they strip whole plants).
Diseases: Alternaria blight, black leg, black rot, downy mildew, fusarium wilt and wirestem.
Clubroot: (Plasmodiophora brassicae): This serious root disease is a big problem in some areas. It causes the roots to swell up like clubs and can kill the plant. Clubroot likes acid soil, so the closer your soil is to neutral the better. If this disease gets into your soil it can stay there for years, even without any Brassicas to infect.
Boron deficiency: Brassicas generally are quite susceptible to boron deficiency, which manifests itself as hollow stems.
This is one of the freshest photographs you will ever see online, I quite literally got up from writing this and went outside to take it. I then came back in and uploaded it!
Harvesting
When: Harvest the first shoots as soon as they reach full size. You can eat them before this time, but you won’t get as much food. The flower buds should be visible individually, somewhat swollen and dark in color. If you miss the optimal harvest time you should still cut off the heads, as this will stimulate the plants to produce new side shoots
How: These are cut with a long (5˝) stem attached. The plants may continue to send up new small heads for weeks.
Storage: Broccoli is quite perishable so is best used immediately. It will keep for up to a week in a plastic bag in the fridge (don’t wash it), but won’t be as good as when it was fresh (this isn’t supermarket food). For longer term storage broccoli freezes well.
Seed saving: Sprouting Broccoli is a biennial and takes two years to produce seed. Don’t save seed from plants that flower in their first year, as you don’t want to raise an annual strain that bolts quickly.
The plants are usually self-incompatible and must be cross-pollinated by insects. This means there must be a number of plants flowering at the same time. Normally you should save the seed from at least 5 plants to maintain some genetic diversity.
All of the cole crops are the same species and will cross with each other. To maintain racial purity you have to ensure that only one type (and variety) flowers at once. The alternative is to isolate them, either by distance (1000 yards for different varieties, 1500 yards for different crops), or by caging them (don’t forget they need insects for pollination).
The seed pods should be gathered when the older bottom pods first start to split open. Watch them carefully as they shatter easily when they are fully ripe. Cut the seedpod bearing stems and dry them in a warm place (I put small quantities in a paper grocery bag, so I don’t lose any seeds). The seeds are fairly big and are easily handled and cleaned. Of course it is essential that they are thoroughly dry before storage.
Varieties:
This isn’t a very common crop in this country, though it is finally being recognised for its merits.
Purple Sprouting Broccoli
White Sprouting Broccoli
These are the only varieties you are likely to find.
Nine Star Perennial
This semi-mythical perennial variety, is pretty hard to find in North America (If you have some seed, I would love to get some off of you.)