


Asparagus
Asparagus officinalis
Introduction: This native of coastal areas of Eurasia has been prized as a gourmet food since the ancient Greeks. The newly emerging spring shoots are regarded as one of the great delicacies of the vegetable garden.
Crop value: Asparagus is a great perennial crop. It’s low maintenance, easy to grow, expensive to buy and better when home grown. As an added bonus it’s available early in the growing season, when few other crops are producing.
Asparagus does have some significant drawbacks as well. It takes a long time from planting to first harvest. The harvest season itself is pretty short, usually only 6 weeks or so. Perhaps most importantly for the intensive gardener, a good sized planting takes up a lot of space. When you consider all of these factors, it’s not surprising that asparagus is one of the most expensive vegetables to buy.
Ease of growing: Asparagus is a pretty independent plant and doesn’t require much care. It isn’t very productive for the space it occupies, so isn’t a good crop for small gardens, or intensive beds in general. It is quite attractive though and can be planted in any spare corner of the garden, or even grown as an ornamental. Birds eat the
berries and sow the seeds, so given the right conditions it may escape from your garden and naturalize.
Nutritional content: Asparagus has been called a superfood for its nutritional content. It is rich in vitamins A, B6 and C, as well as soluble fiber, selenium, folate, rutin and various antioxidants. It is low in energy, with only about 90 calories per pound.
| About Asparagus Seed facts Germ temp: 50 (60 – 85) 95˚F “ time: 7 – 21 days 53 days / 50˚F 24 days / 59˚F 15 days / 68˚F 10 days / 77˚F * Optimum 12 days / 86˚F Seed viability: 2 – 5 years Weeks to grow transplants: 10 – 12 Planning facts Perennial in zones: 4 – 9 Growing temp: 45 (60 – 75) 85˚F Plants per person: 5 Plants per sq ft: 1 plant needs 2 – 4 sq ft Plant height: 3 – 5 ft Plant diameter: 2 – 3 ft Planting Start: 11 wks before last frost Plant out: 1 wk after last frost Direct sow: 2 wks after last frost Days to harvest: Seed – 3 years Root – 2 years Harvest facts Harvest period: 6 weeks Yield per plant: ½ – 1 lb (20 shoots) Yield per sq ft: 12 oz sq ft |
Climate: Asparagus prefers mild temperatures, not too hot and not too cold. It doesn’t like very hot humid areas, or very mild winters (it needs a significant rest period).
Soil
pH 6.5 (6.8-7.0) 7.5
Asparagus isn’t a particularly fussy plant, but it will produce more food if given ideal soil. This is deep, rich, well-drained and fairly neutral (not acidic) with lots of organic matter to help it retain water. Originally a coastal plant, it is very tolerant of saline soil.
Plants growing on very light and sandy soil should be monitored carefully to ensure they don’t dry out.
Asparagus will also do okay on heavy soil, so long as it is well-drained. It can tolerate short term flooding, but prolonged wet soil can cause the fleshy roots to rot over the winter. If you want to grow asparagus in soil that gets wet in winter, you should plant it in raised beds.
Soil preparation: It’s important to amend an asparagus bed thoroughly (and lime if necessary), prior to planting. Once the plants are in the ground, you can’t incorporate anything else and any further fertilization must be as a top dressing or mulch.
If your soil is heavy or compacted it is a good idea to double dig an asparagus bed before planting. This allows you to cultivate the soil to a depth of 20 – 24˝ and enables you to remove perennial weeds (very important), tree roots and other debris.
Deep cultivation also allows you to incorporate organic matter and amendments evenly throughout the soil. Incorporate as much compost, or weed free aged manure as you can spare, along with liberal quantities of colloidal phosphate (it loves phosphorus), greensand (for potassium) and kelp (for trace elements). Of course you could also just use an organic fertilizer mix.
Planning
Where: An asparagus bed may last 15, 20, 30, even 50 years (100 year old beds have been known), which is longer than many fruit trees. Consequently it is important to choose the growing site carefully.
The first criterion is that it should be in full sun. It will take some light shade, but won’t be as productive. The bed should be sheltered from strong winds and well away from large trees or shrubs, with their vigorous feeder roots. Lastly it should be placed where it won’t cast unwanted shade, compete
with other crops, or interfere with other everyday garden operations.
An asparagus bed takes a lot of space. Each plant sends out roots several feet in all directions and they must be spaced far enough apart to prevent competition. In addition the individual plants aren’t particularly productive, so you need quite a few to get a reasonable harvest (ideally at least 5 plants per person). Taken together these factors can make for a pretty good size growing bed.
If you don’t have the space for a full sized bed of asparagus, you might be able to fit a dozen or so plants in various spots around the garden. You won’t get a huge harvest, but it’s better than nothing. Asparagus is quite pretty with its ferny foliage and can blend into the ornamental garden pretty well.
Planting
Planting options: Asparagus is most often grown from 1 or 2 year old roots. If you have more time than money you can grow your own roots from seed, instead of buying them.
Raising transplants
If you are patient, you can raise asparagus from seed and plant it out when a year old. This is the least expensive way to go, though of course the drawback is having to wait 3 – 4 years to get a worthwhile harvest. However this isn’t such a big deal if you consider that they may live for 20 or 30 years.
Growing from seed can be somewhat unpredictable as some seed may be more vigorous than others (small seed is often inferior and is sometimes discarded). Some authorities recommend treating the seed with bleach to control fungus disease. Pre-soaking seed (at 60 – 80˚F for 2 – 4 days) can be useful to speed germination.
Starting indoors: Seeds are usually started indoors in late winter, about 3 months before the last frost date. This gives them the maximum growing time in their first year.
Start the seed in individual 4˝ pots, cell packs or 1 ½˝ speedling trays. Normally you plant two seeds to a pot / cell and remove the weakest one when both have germinated. They can also be grown in 4˝ deep flats, just sow the seed 2˝ apart and ½˝ deep.
Keep the containers at 75 – 85˚F until all seed has germinated and then reduce it to 70 -75˚F (60 – 65˚F at night). Better seedlings result if it isn’t too warm.
The seedlings grow quite vigorously and in 3 months may be 9 – 12˝ tall and big enough to be planted outside in a temporary nursery bed, or even planted in their permanent position (See Using 12 week old transplants). By next spring the one year old roots will be ready to go out into their permanent position (only use the most vigorous plants).
Starting outside: The seed may also be started outside in a nursery bed, when the soil has warmed up a little (to at least 50˚F) or about 2 weeks after the last frost date). Plant the soaked seeds 3˝ apart and 1 – 2˝ deep. You might also plant a few radish seeds to mark the row, as the asparagus may take a while to germinate.
Weed the newly emerged seedlings carefully and when they are 6˝ tall thin them out (you could try transplanting the thinnings) to stand 6˝ apart. They are then left to grow for one year and dug the following spring. They can put on a surprising amount of growth in this time.
Direct sowing: It is possible to sow directly into the prepared asparagus bed (it is certainly vigorous and fast growing enough). However it isn’t very practical to plant a seed every 24˝ and then wait for a couple of years. Planting in a nursery bed makes a lot more sense.
Using 12 week old transplants
This is a recently developed alternative method of growing asparagus from seed. The seedlings are grown as described above and planted out in their permanent position after all frost danger is past. They go in a small ridge (3˝ high) at the bottom of a 8˝ deep trench. Space them 10 – 18˝ apart in the row, with 4 – 6 ft between rows (trenches). You might want to plant something else in between the rows to temporarily make use of the empty space.
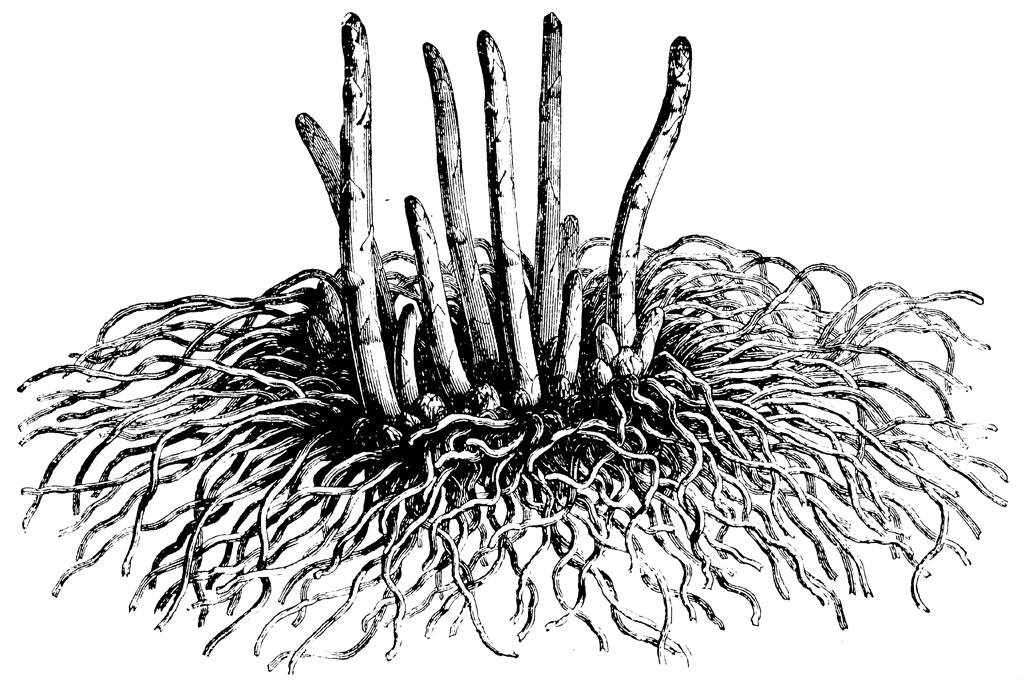
Roots
Asparagus is usually grown from one or two year old roots. The two year old plants produce earlier, but one year old plants are generally better. These are not only cheaper, but can eventually out-produce the older plants because they suffer less from transplant shock (asparagus doesn’t really like transplanting). They are also less troubled by disease, probably because of their more vigorous root system.
If you can’t plant the crowns as soon as you get them, they should be stored in a cool place in the shade (ideally at 40˚F and 90% humidity).
Planting roots:
Asparagus can be planted out in early spring, as soon as the soil is in workable condition (and at least 50˚F). However there is no rush, as it will take up to three years before you get a good harvest. Some people say late spring is actually better, as the plants will start growing faster in the warmer soil. This means there is less danger of loss to rot. Transplant only the best individuals and discard any weak or inferior roots (or plant them in the ornamental garden).
Planting: Both one and two year old crowns are planted in the same way. The traditional procedure is to dig a hole or trench 18˝ wide and 12˝ deep. Put a small mound of compost in the trench, along with a source of phosphorus and spread the roots out over the mound. Cover the root with a 2˝ layer of a soil mix (3 parts soil to 1 part compost) and water thoroughly. As the plants grow, slowly fill up the trench with more of the same mix.
Recent opinion is that you don’t have to be quite so careful in your planting. It is now thought that gradual burial isn’t necessary and that you can just fill the hole loosely with soil up to the original level. Careful spreading of the roots probably isn’t necessary either.
Shallow planting: Researchers have found that asparagus yields more and earlier, if planted at a depth of only 6˝, rather than the traditional 12˝. This fact can also be used to give you more flexibility in harvesting, as you can have some early yielding (shallow planted) plants and some later yielding (deep planted) plants.
Spacing:
Rows: The recommended row spacing is 18 – 24˝ (depending upon the fertility of the soil) between plants, with 5 ft between the rows. This gives the plants plenty of room to fill in as they grow, but also provides for good air circulation.
It has been found that wider spacing produces more shoots and they also tend to be larger. In tests it was found that plants spaced 24˝ apart, produced twice as many spears as plants that were closer together. This can give you the same harvest while using less plants.
Beds: In a 5 foot wide bed you might plant three rows, with 18˝ between the rows and 18˝ between the plants.
Care
Asparagus is an independent plant, but if given even a moderate amount of care, it will be much more productive. A well cared for asparagus bed should last for thirty years or more, but it can deteriorate quickly if neglected or over‑harvested.
Weeds: If you conscientiously removed all perennial weeds before planting your asparagus bed and apply a thick mulch, then weeds should not be a big problem. They will need occasional weeding in their first year, but these vigorous perennials get tall and soon outgrow most weeds.
You should give the established bed an occasional maintenance weeding to stop new weeds getting established or seeding. Hand weeding is recommended, so as not to disturb the shallow feeder roots. Traditionally weeds were killed with salt water, as asparagus is very salt tolerant, but this is no longer recommended as it is bad for the soil (and everything else).
Volunteer asparagus seedlings can become weeds themselves.
Watering: It is important to keep the soil moist (not wet) while the plants are young. Older plants are quite drought tolerant and rarely need watering in areas with summer rainfall. The amount of water they get in summer is important because it determines how much food they can store and how many shoots they will produce in the following spring.
In very dry areas they should receive an occasional deep watering to keep the plants growing vigorously. If they get too dry they may go dormant in summer, which is not good because it means they are not storing food for next year.
Automated drip irrigation works best as it means you can forget about these low maintenance plants altogether.
Generally the plants don’t need much watering while they are producing spears in spring, because there is usually plenty of moisture in the soil and they aren’t photosynthesizing very much. Once the ferns start to unfurl they require more water.
Plants are often allowed to dry out in September so they will stop growing and start to store food for the winter.
Fertilization: Asparagus isn’t a very hungry plant and doesn’t need a lot of fertilization, but you have to think about this carefully because it is a perennial. Most nutrients will be supplied by mulching (see below), but to encourage maximum production you can also give them a foliar feed of compost tea or liquid kelp, once or twice in the season. In poor soil you might also apply a side dressing of fertilizer mix either before emergence or after you finish harvesting.
Renewal: If a plant starts to decline you can dig it up in winter and divide it. Separate the plant into separate pieces, each with several growing buds. Replant them as if they were new crowns.
Mulch: The best way to fertilize asparagus is with a nitrogen rich mulch of compost, aged manure or seaweed (asparagus loves seaweed), applied in fall. This works well because asparagus is shallow rooted and most of its feeder roots are near the surface.
Newly planted beds have a lot of bare soil, which should be covered with mulch to prevent soil degradation.
Problems
Pests: Asparagus beetles, cucumber beetles, aphids, leafhoppers, asparagus miners, Japanese beetles, tarnished plant bugs, thrips and cutworms all attack asparagus, but their damage isn’t usually too serious. Just keep an eye on the foliage to make sure the damage doesn’t get out of hand.
Slugs can be devastating to the young plants. I once had a whole planting wiped out by slugs. Every time the plants re‑sprouted they were cut down again.
I once had another problem where whole fronds were disappearing, leaving just a stub. This perplexed me, I just couldn’t figure out what would do that kind of localized damage. It turned out my girlfriend was taking the pretty ferns for use in flower arrangements.
Disease:
Fusarium wilt, Verticillium wilt: These diseases may be seed borne so if in doubt you should treat seed with hot water (122˚F for 25 minutes) or dilute bleach solution (be careful with this as you can damage the seed). Some varieties are resistant / tolerant.
Crown rot (Fusarium moniliforme) and Asparagus rust (Puccinia asparagi) can also be serious problems and can survive in soil for years. Many newer varieties are resistant to rust.
Gophers: These creatures love asparagus as much as humans. If these are a problem, you will have to protect each individual plant with a good sized basket of gopher wire. There is nothing more discouraging than finally having your plants start to produce after several years, and then see them disappear down a gopher hole (except maybe never seeing them again and not knowing why).
Control: Asparagus often self-sows all over the place and can become a minor weed problem. I don’t mind though as they can be a good source of plants for transplanting, bartering or giving away.
Self sown seedlings can be a significant problem for commercial growers however. They often stop the plants from self-seeding by cutting the tops in fall, when the foliage begins to turn yellow. If you only have a few plants you could simply remove the berries.
Harvesting
When: The year after planting the roots you can get your first small harvest. Do this quite sparingly and only harvest for 2 – 3 weeks. This cutting can actually stimulate the plants to create more buds.
The second year you might harvest for a month (or longer if the plants are very healthy).
From the third year onward you can harvest for 6 weeks or more. The state of the plants will tell you when to stop harvesting. If most of the shoots are less than 3/8˝ in diameter then it’s time to stop picking.
The emergence of the first spears is dependent on soil temperature and starts when it gets up to 50˚F. You can start gathering the shoots when they reach 6 – 8˝ in height and are still tightly closed. As the temperature rises the shoots will start to emerge more rapidly and you may have to harvest daily to keep up. Once the tightly curled tops start to loosen, the shoot starts to toughen and eventually becomes inedible, so pick them before this happens.
The growth of the spears varies according to the weather and can be slow in cool temperatures or very rapid in favorable conditions (in some situations it may be necessary to harvest twice daily).
You may be surprised to find that the small spears are often tougher than large ones. This happens when they grow more slowly and so contain more lignin.
If you are harvesting for personal use you don’t care if the spears are crooked or bent.
How: The best way to harvest is to snap the shoot off down at ground level (any remaining stub will dry up and disappear). This also has the advantage that it breaks where it gets tender. The traditional method is to cut them with a knife just above the crown, but there is a danger that you will damage emerging buds. Keep them cold after harvest for best flavor.
Don’t harvest too many spears from a single root in one season, as you can weaken it.
Storage: The spears can be stored in a plastic bag in the fridge for 7 – 10 days. For longer-term storage freezing works best.
After harvest: The beds must be treated properly after harvest because it is the summers growth that provides energy for the following years crop. The larger the ferns get, the more food they produce and the bigger the future harvest. Keep the plants well watered and watch for signs of pests or disease.
If you must cut back the plants in fall, don’t do it while they are green, wait until they die off. Actually it’s best not to cut back the tops at all, as they help to protect the crown and can hold snow in place over the winter.
Unusual growing methods
Ornamental use: With its feathery, light green foliage asparagus is undeniably an attractive plant. As it can take up a lot of room for relatively low return, there is a good argument to be made for putting it in the ornamental garden instead of the vegetable garden.
Male plants: Asparagus plants are dioecious, which means there are separate male and female plants. It has been found that male plants produce up to 25% more spears than females, though they tend to be slightly smaller. Another benefit of male plants (for commercial growers at least) is that they don’t self-seed. There are now a number of cultivars that produce all male plants.
Forcing: To get an earlier crop the roots can be forced in spring, as described under Rhubarb.
Delayed harvest: One way to get a longer asparagus harvest is to initially harvest from only half of your bed. When this half begins to slow down, after 6 weeks, cut down all the new growth on the other half and it will send up a fresh crop of shoots. You can then cut from this for a further 4 – 6 weeks.
It is also possible to get shoots later in the year, by cutting the plants right down to the ground, which forces them to send up more. This practice runs the risk of weakening the plants however.
Wild garden: Asparagus is a long lived perennial and is often found on the sites of abandoned gardens. If it can do this then it can also grow in your non-abandoned garden with equal ease. It does well as a border for the vegetable garden, or at the edge of a forest garden (it does need plenty of sun though).
Propagation: You can propagate asparagus vegetatively be dividing the crowns. Just make sure each piece has several buds. This is useful if you want to multiply a small number of special plants (or any of the hybrids).
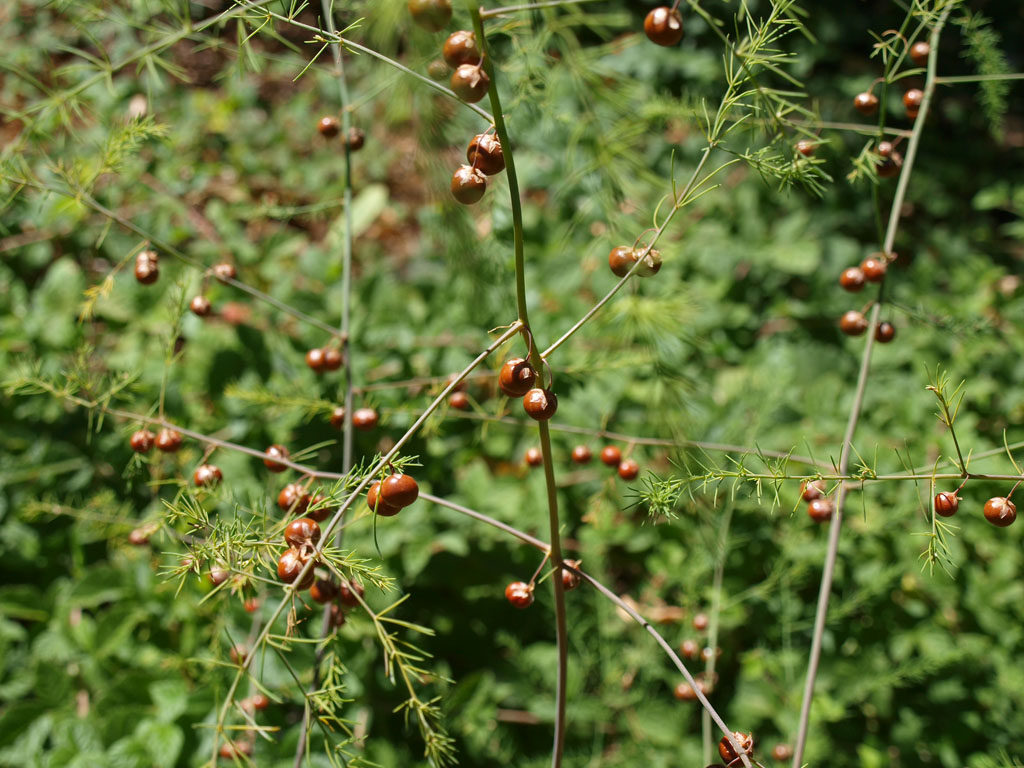
Seed saving: You don’t really need to save asparagus seed as it is a perennial, but it is easy enough to do. The plants are insect pollinated, so to keep a variety pure there should be no other asparagus varieties (or wild plants) within a mile. The plants are dioecious and only the female plants produce the red berries, each containing 6 seeds.
Varieties
Choosing the right variety is particularly important with asparagus because you will be living with it for many years. You can’t change to a different variety without starting all over again.
If you buy your asparagus plants locally you will only have a limited choice of varieties. If you want an unusual variety you will probably have to mail order it.
Connovers Colossal – An old variety, good for growing from seed.
Argenteuil – Rust resistant French variety.
Martha Washington – An old standard.
Mary Washington – Another time tested classic.
Purple Passion – Has purple spears that are supposed to be sweeter.
Hybrids: There are now quite a few hybrids that produce very vigorous all male plants. These don’t waste energy producing seeds, so are more productive than female plants. Generally I hesitate to grow hybrids, because I like to save my own seed, but in this case you only need to plant it once, so it isn’t really an issue. If you do want to multiply them you can always divide the plants
I have read that the hybrids can start to lose vigor after a few years and don’t last as long as the older varieties (I don’t know how true this is, but it wouldn’t surprise me).
All males: These include
Jersey Giant – Prolific and rust resistant
Jersey Knight – Prolific and rust resistant
Supermale – Are supposed to produce twice as many spears as other types.
Kitchen use
The traditional way to cook asparagus is to tie the spears together in a bundle and boil them upright. The tender tip is out of the water and is cooked by the rising steam (if under water it would be overcooked). They need about 10 minutes to cook sufficiently. Gourmets with too much disposable income can buy special tall asparagus pans, specifically designed for cooking it to perfection.
The problem with boiling asparagus is that it leaches out some of the valuable nutrients. It is better to steam or roast it.
| Asparagus soup This is a great way to use an over-abundance of asparagus. 1 lb asparagus 1 medium onion 1 ½ cups vegetable stock 1 cup soy milk 1 tbsp butter 2 tbsp flour 1 tsp salt ½ tsp black pepper Simmer the asparagus and chopped onion with a ½ cup of vegetable stock until tender. Put it in a blender and puree until completely smooth. Melt the butter in a pan, with the flour and salt and pepper and cook for 2 minutes, stirring to prevent it turning brown or burning. Add the rest of the stock and bring to the boil, stirring to make it smooth. Then add the soy milk and the asparagus puree and heat up thoroughly, stirring occasionally. |